
Have a Question?

How to Set Up Device Status and Event Notifications in the INS LifeGuard Manager’s Portal
INS LifeGuard • September 16, 2026

INS LifeGuard is a 24/7 nurse-monitored emergency personal alarm service supporting retirement villages, NDIS providers, allied health professionals, aged care organisations, and supported independent living environments.
We go beyond emergency response by offering technology-driven tools that help providers stay connected to those they support. These tools deliver real-time insights, automated alerts, and centralised resident data through our secure web-based Manager’s Portal.
One of the most impactful features available in the portal is customisable Device Status and Event Notifications. This guide explains what they are, how to set them up, and why they matter for any care provider striving to improve safety, compliance, and efficiency.
What Are Device Status and Event Notifications?
Device Status and Event Notifications allow authorised staff to receive automatic alerts when a device reports an issue or an incident occurs. These alerts are delivered via email or SMS and can be customised to ensure the right people are informed at the right time.
There are two types of notifications:
1. Automated System Alerts
These are triggered directly by the device or system:
- Power Fail
- Low Battery
- Missed Check-In
2. Operator-Sent Notifications
Sent by our clinical response team following an emergency or maintenance event. These messages provide extra context about what happened and what action was taken.
Why This Feature Is Important for Care Providers
Receiving real-time alerts helps organisations deliver more proactive, responsive care while reducing risk. Here’s why this feature is valuable in both retirement living and supported care environments:
Proactive Risk Management
Alerts such as "Low Battery" or "Missed Check-In" help you identify and resolve issues before they impact resident safety.
Faster Response Times
No need to log in constantly — your team is notified automatically when action is required.
Tailored Communication
Send alerts only to relevant staff based on their roles and responsibilities.
Reduced Overnight Disruption
Unless urgent, notifications can be scheduled for delivery within working hours, supporting staff wellbeing and shift planning.
Clear Record Keeping
All notifications are logged in the portal, helping with audits, compliance documentation, and internal reviews.
Who Can Manage These Notifications?
Access to notification settings is based on user roles within the Manager’s Portal:
| User Role | Can Configure Alerts? |
|---|---|
| Super User | Yes – for all sites managed |
| Village Manager | Yes – for their assigned village |
| Village Staff | No |
| Village Maintenance | No (view-only access to device status) |
Our support team can assist you if you’d like to adjust your team's access levels.
Step-by-Step: How to Set Up Notifications
To begin using Device Status and Event Notifications:
Log in to the INS LifeGuard Manager’s Portal
Access the INS LifeGuard portal here →
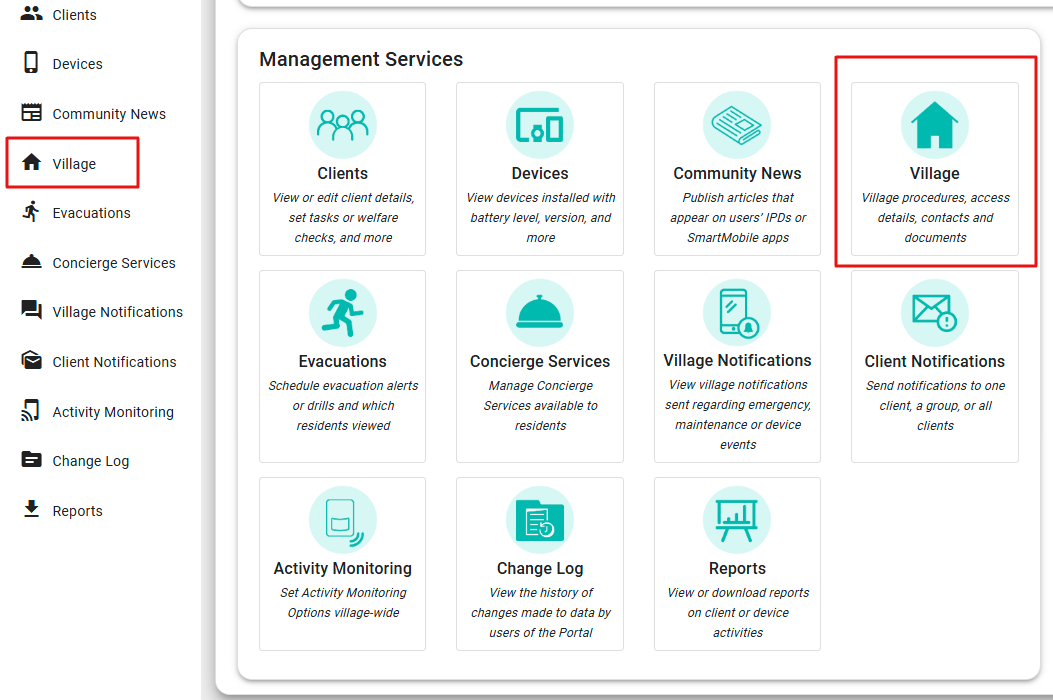
Click on the village button
On the home screen or sidebar.

Go to the Contacts Tab
Click the pencil icon on the contact you want to set notifications for, then select Add Notification.
Choose the Notification Types You Want to Activate
Select from Power Fail, Low Battery, Missed Check-In, Emergency, and Maintenance.
Select Staff Recipients
Assign individual team members or multiple recipients for each notification type.
Choose How Alerts Are Sent
You can choose between email, SMS, or both for each contact.
Define Time Windows
Set working hours or after-hours rules to control when non-urgent notifications are delivered.
Save Your Settings
Changes take effect immediately and can be updated at any time.
Need help with setup? We’ve created a quick how-to video. Watch the setup video
Video Transcript
This video will demonstrate how to set custom notifications for village management. These can include notifications sent by our nurses after emergency or maintenance events, as well as automated notifications based on the status of your devices. If you don't yet have access to the LifeGuard Manager's Portal, please send an email to lifeguard@theinsgroup.com.au to request access, and we will set it up for you.
Click on the Village button, either on the home screen or in the sidebar. First, check to be sure that your time zone has been set. If there is no time zone shown, you will need to set one before you can create any village notifications. Click the edit button, choose your time zone from the dropdown list, and click Save.
Click the Contacts tab. The contacts that INS has on file for your village will be shown. To add a new contact, click the Add Contact button. To remove a contact, click the trash icon.
Click on the pencil icon to edit the contact that you wish to add notifications for. Check that their contact details are correct, then click Add Notification.
Choose the type of notification you wish to set from the dropdown list. Device status notifications include Power Fail, Low Battery, and Missed Check-In. These are system-generated as events are received by our central monitoring system. Emergency and Maintenance notifications are sent by our operators after alarms are taken. This enables them to provide information about what has occurred and what actions they've taken. Bear in mind that we may only be able to share basic details regarding emergency events, depending on resident permission.
We'll select Emergency as the notification type. Under Notify Via, choose either Email or SMS. If you leave the From and To fields blank, you'll receive those notifications at any time. Alternatively, you can specify certain hours during which you wish to receive them.
If you would like to receive these same notifications via both email and SMS, simply add another notification of the same type and choose SMS. You can continue to add more notification types, for example, we'll choose Maintenance. This time, I'll set it to send only between the hours of 8 and 5. You can type this in the fields or use the time picker.
Continue setting all the notification types you want for this particular contact. When you're finished, click Save. You can see that the notifications have been set for this contact by the information symbol next to the phone number or email address. If you hover over that, it will show which types of notifications have been set for that mobile number or email address.
You can now set notifications for any other contacts if desired. In this case, we'll set one for the maintenance supervisor. We'll set a Maintenance notification and choose SMS, leaving the fields blank so it sends at all times. Then click Save. Hover over the mobile number, and it will show that the maintenance notifications have been set.
That's it. You now have full control over the notifications your village will receive, whether for device status, maintenance issues, or emergency events. You can change them at any time.
If you require further assistance, please contact us on 1800 636 226 or email lifeguard@theinsgroup.com.au.
Best Practices for Using Notifications Effectively
- Use
SMS for urgent alerts, email for informational messages
- Adjust
notification schedules for on-call or overnight staff
- Regularly review recipient lists to ensure coverage
- Encourage teams to test and review device alerts monthly
- Include alert reviews in staff handovers or morning meetings
Additional Portal Features to Explore
Device notifications are just one part of a larger connected care ecosystem. The Manager’s Portal also offers:
- Real-time dashboards
- Broadcast messaging to residents and families
- Concierge service coordination
- TeleHealth integration
- Scheduled reporting and activity logs
- Secure resident data and care protocols
To learn more, view our full Manager’s Portal feature overview →
Summary: Deliver Safer, Smarter Care
By configuring Device Status and Event Notifications, you ensure that critical information reaches the right people as soon as needed. This allows your organisation to respond quickly, maintain oversight, and enhance the level of care you provide, all while keeping residents safer and staff more supported.
Whether you manage a single village or a group of supported living homes, these tools scale with your needs.
Have questions or need setup support?
Call us on
1800 636 040 or
submit an enquiry here.
About
INS LifeGuard is the only 24/7 nurse on-call personal and medical monitoring in Australia. We provide monitoring technology for both in the home and on the go and can also monitor other provider's equipment. Our services are suitable for anyone wanting support to stay independent such as the elderly, those with medical conditions and disabilities plus enhancing safety and security for lone workers.